GSG灰度大猩猩Plus中心插件HDRI和材料2021年 大小:59G
信息:
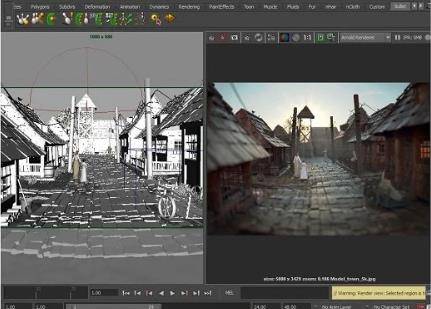
这是最新的(截至2021年4月29日)GSG Plus HUB,包括Plus订阅的所有插件、材料和HDRIs。
支持c4d版本:R23、S24(仅限Windows)
该包包含最新的GSG plus插件。
1.大猩猩凸轮
2.HDRI链接
3.HDRI工作室
4.轻型套件专业版
5.轻型套件专业包
6.灯光类型
7.信号
8.超级文本
9.外套
10.变换
11.纹理套件专业版3.01
12.GSG城市套装2.003版
阿诺德、辛烷和红移的下列材料集)
1.GSG电磁兼容系列
2.GSG·MSMC系列
3.GSG科技产品资料收集
4.GSG汽车涂料(新)
最后,HDRI和纹理系列:
1.区域灯光地图
2.区域照明地图第2卷
3.商业场所
4.欧洲假日
5.现代工业
6.天堂
7.专业工作室
8.专业工作室金属
9.公路旅行
10.工作室基础
11.终极天空4K
12.表面缺陷:划痕
13.表面瑕疵:污迹
安装方法
我已经重新配置了文件夹排列,以方便安装。
第一步:打开4D电影院>编辑>偏好设置
您会注意到窗口底部有一个“打开首选项文件夹”。
单击打开文件夹。
第二步:在打开的窗口中找到“插件”文件夹。
步骤3:根据C4D版本(R23/S24),将前两个文件夹的内容复制到插件文件夹中。
您的插件目录结构应该如下所示:
c:\用户\…..\应用数据\漫游\马辰\马辰电影院4D R24 _ c2a 528 F6 \插件\灰色大猩猩
c:\用户\…..\应用数据\漫游\马辰\马辰电影院4D R24 _ c2a 528 F6 \插件\win_r24_greyscalegorillahub
这差不多就是安装集线器和插件的原因。
对于材质、纹理和HDRIs,请执行以下步骤。
第一步:4D电影院>编辑>偏好设置
您将在左侧栏中看到一个灰度大猩猩条目。点击它。
第二步:它给你分配资产文件夹的选项。单击路径定位器,并将其指向主文件夹“05 _材料_地图和人类发展报告系统”中的“GSG资产”文件夹。
您可以将这些资料保存在任何地方,甚至保存在不同的硬盘上。只要记得链接正确的文件夹。
我已经在Windows 10 20h 2 Build 19042.964(x64)上测试过它,它工作正常
GSG Greyscale Gorilla Plus Hub Plugins HDRI & Materials 2021 Win
Info:
This is the latest (as of 29/4/2021) GSG Plus HUB including all plugins, materials, and HDRIs from the plus subscription.
Cinema 4d versions supported: R23, S24 (Windows only)
The pack contains the latest GSG plus plugins.
1. Gorilla Cam
2. HDRI Link
3. HDRI Studio
4. Light Kit Pro
5. Light Kit Pro Packs
6. Light Types
7. Signal
8. Super Text
9. Topcoat
10. Transform
11. Texture Kit Pro V3.01
12. GSG Plus City Kit v2.003
The following material collectionsFor Arnold, Octane & Redshift)
1. GSG EMC collection
2. GSG MSMC collection
3. GSG Tech Products Material Collection
4. GSG Car Paints (NEW)
Finally the HDRI & Textures Collections:
1. Area Light Maps
2. Area Light Maps Vol 2
3. Commercial Locations
4. European Holiday
5. Modern Industrial
6. Paradise
7. Pro Studios
8. Pro Studios Metal
9. Road Trip
10. Studio Basics
11. Ultimate Skies 4K
12. Surface Imperfections: Scratches
13. Surface Imperfections: Smudges
Installation Method
I have reconfigured the folder arrangements compared to the original upload for ease of installation.
Step 1: Open Cinema 4D > Edit > Preferences
You will notice an “Open Preferences Folder” at the bottom of the window.
Click to open the folder.
Step 2: Locate the “Plugins” folder in the opened window.
Step 3: Depending on the C4D version (R23/S24) copy the contents from either of the first two folders into the plugins folder.
Your Plugins directory structure should look like this:
C:\Users\…..\AppData\Roaming\Maxon\Maxon Cinema 4D R24_C2A528F6\plugins\Greyscalegorilla
C:\Users\…..\AppData\Roaming\Maxon\Maxon Cinema 4D R24_C2A528F6\plugins\win_r24_greyscalegorillahub
That’s pretty much it for installing hubs and plugins.
For the materials, textures and HDRIs do the following step.
Step 1: Cinema 4D > Edit > Preferences
You will see a Greyscale Gorilla entry in the left sidebar. Click on it.
Step 2: It gives you the option to assign your asset folder. Click on the path locator and point it to the “GSG Asset” folder inside the master folder “05_Materials_Maps & HDRIs.
You can keep this material collection anywhere, even on a different hard disk. Just remember to link the correct folder.
I have tested it and its working fine on Windows 10 20H2 Build 19042.964 (x64)
1、登录后,打赏30元成为VIP会员,全站资源免费获取!
2、资源默认为百度网盘链接,请用浏览器打开输入提取码不要有多余空格,如无法获取 请联系微信 yunqiaonet 补发。
3、分卷压缩包资源 需全部下载后解压第一个压缩包即可,下载过程不要强制中断 建议用winrar解压或360解压缩软件解压!
4、云桥CG资源站所发布资源仅供用户自学自用,用户需以学习为目的,按需下载,严禁批量采集搬运共享资源等行为,望知悉!!!
5、云桥CG资源站,感谢您的关注与支持!