工期1小时35分 包括项目文件 1280X720 MP4 大小解压后:1.04G 语言:英语+中文字幕(云桥CG资源站 机译)+原英文字幕
标题:Skillshare–Blender纹理绘制初学者指南
信息:
您是否有兴趣学习如何在3D对象上绘制纹理,以便在自己的个人项目中使用?
纹理绘制是一种技巧,它涉及到为纹理应用程序启动3D对象的过程,然后使用各种笔刷和工具自定义绘制我们自己的纹理和图案。许多视频游戏资产使用为这些特定资产创建的纹理,在某些情况下甚至遵循非常特定的艺术风格。
如果纹理绘画的艺术听起来像是一种技能,你想拿起,那么这门课程将让你开始。使用blender3d,一个免费的开源软件,你可以开始创建自己独特的设计纹理。
我们不仅教您如何使用纹理绘制工具,而且还介绍了设置3D对象所需的步骤,以便为纹理做好准备。我们专注于…
创建UV贴图以便控制纹理的放置位置
指定材质,以便我们的纹理可以渲染到对象的表面上
将纹理连接到指定的材质
使用基本工具,如绘制和填充笔刷
为更详细的纹理创建程序笔刷
类资源附加到类项目
今天就开始学习在Blender中绘制3D对象的过程!
课程目录:
01-欢迎来到课堂
02-所需工作区概述
03-uv地图的基础
04-确保我们的物品有材料
05-为我们的纹理创建空白画布
06-将纹理添加到我们的材质中
07-第二种方式添加纹理到材质
08-油漆基础
09-使用滴管
10-将映射到纹理
11-使用其他刷子
12-填充工具
13-确保保存图像
14-移动到我们的场景
15-智能UV投影
16-添加材料到场景中
17-连接底部纹理
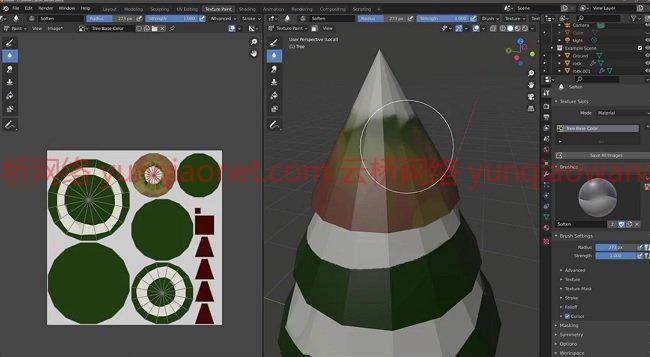
18-给树一些颜色
19-使用遮罩进行喷漆
20-混合类型和梯度
21-改善我们的纹理
22-创建程序画笔
23-级挑战赛结束
Duration 1h 35m Project Files Included MP4
Info:
Are you interested in learning how to paint textures onto 3D objects for use in your own personal projects?
Skillshare – Beginners Guide To Texture Painting In Blender
Texture painting is a skill that relates to the process of priming a 3D object for texture application, and then using a variety of brushes and tools to custom paint our own textures and patterns. Many video game assets use textures that have been created for those specific assets, and in some cases even follow a very specific art style.
If the art of texture painting sounds like a skill that you would like to pick up, then this course will get you started. Using Blender 3D, a free open source software, you can begin creating textures of your own unique design.
Not only do we teach you how to use The texture paint tools but we also cover the steps requires to set up 3D objects so that we can prep them for our textures. We focus on…
Creating UV maps so that we can control where our textures will be placed
Assign materials so that our textures can be rendered onto the surfaces of the objects
Connect the textures to the assigned materials
Use basic tools like the draw and fill brush
Create a procedural brush for more detailed texturing
The class resources are attached to the class project
Get started today learning about the process of painting 3D objects in Blender!
01-welcome_to_the_class
02-an_overview_of_the_required_workspaces
03-basics_of_uv_maps
04-making_sure_we_have_a_material_for_our_object
05-creating_a_blank_canvas_for_our_texture
06-adding_a_texture_to_our_material
07-a_second_way_of_adding_a_texture_to_a_material
08-paint_basics
09-using_the_eyedropper
10-fitting_the_map_to_a_texture
11-using_the_other_brushes
12-the_fill_tool
13-make_sure_to_save_your_image
14-moving_on_to_our_example_scene
15-smart_uv_projection
16-adding_materials_to_our_scene
17-connecting_the_base_textures
18-giving_the_tree_some_colour
19-using_masks_for_painting
20-blend_types_and_gradients
21-improving_our_textures
22-creating_a_procedural_brush
23-end_of_class_challenge
1、登录后,打赏30元成为VIP会员,全站资源免费获取!
2、资源默认为百度网盘链接,请用浏览器打开输入提取码不要有多余空格,如无法获取 请联系微信 yunqiaonet 补发。
3、分卷压缩包资源 需全部下载后解压第一个压缩包即可,下载过程不要强制中断 建议用winrar解压或360解压缩软件解压!
4、云桥CG资源站所发布资源仅供用户自学自用,用户需以学习为目的,按需下载,严禁批量采集搬运共享资源等行为,望知悉!!!
5、云桥CG资源站,感谢您的关注与支持!