

了解如何使用Mari 4节点图和Maya纹理和外观开发资产。在本教程中,我将只使用节点图在Mari 4中查看PBR纹理。使用节点图打开了巨大的灵活性,并允许您非破坏性地工作。这个工作流程背后的想法是在Mari内部重建物质的工作流程。Nodegraph PBR Texturing + Look Development
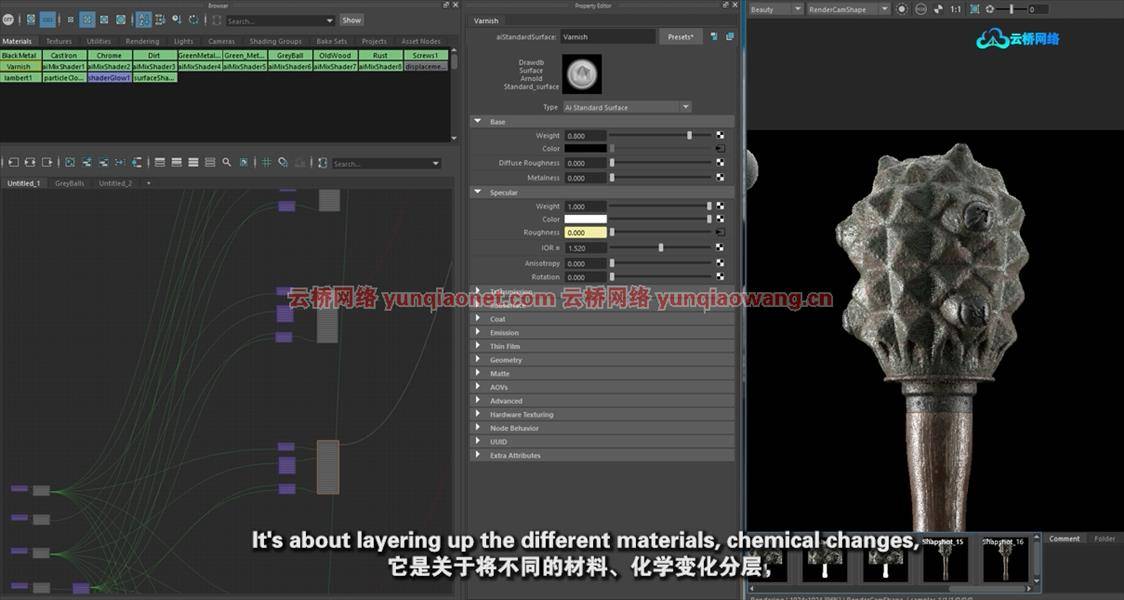
我在本教程中使用了最新的扩展包,但是如果你没有访问扩展包的权限,你仍然可以使用标准的Mari节点。(注:大多数VFX工作室使用扩展包,所以我会高度推荐在跟随本教程时使用它。)一旦纹理完成,我们将把我们的纹理放入Maya并检查外观开发过程,在该过程中,我们通过使用自定义RGB遮罩将所有绘制的通道混合在一起,创建一个生产就绪主着色器。对于这一节,我们将使用阿诺德5,但任何渲染引擎,可以混合材料将工作得很好。RGB 遮罩是纹理的一个非常重要的部分,因为它们允许您在游戏引擎或渲染引擎中细化和调整着色器。不仅如此,他们还经常在VFX的合成阶段使用。
由Nicholas Hodgson创作
MP4 |视频:h264,1280×720 |语言:英语+中英文字幕(云桥CG资源站 机译)|时长:5小时12分钟|含课程文件
你会学到什么
您将学习如何为纹理准备模型
你将学习纹理的基础知识
你将学习如何使用Mari 4节点图
你将学习如何烘焙纹理所需的贴图
您将学习如何使用您的纹理,并在Maya中使用RGB遮罩混合每种材质来设置分层着色器网络。
要求
对Mari 4和Maya有基本了解
课程概要:
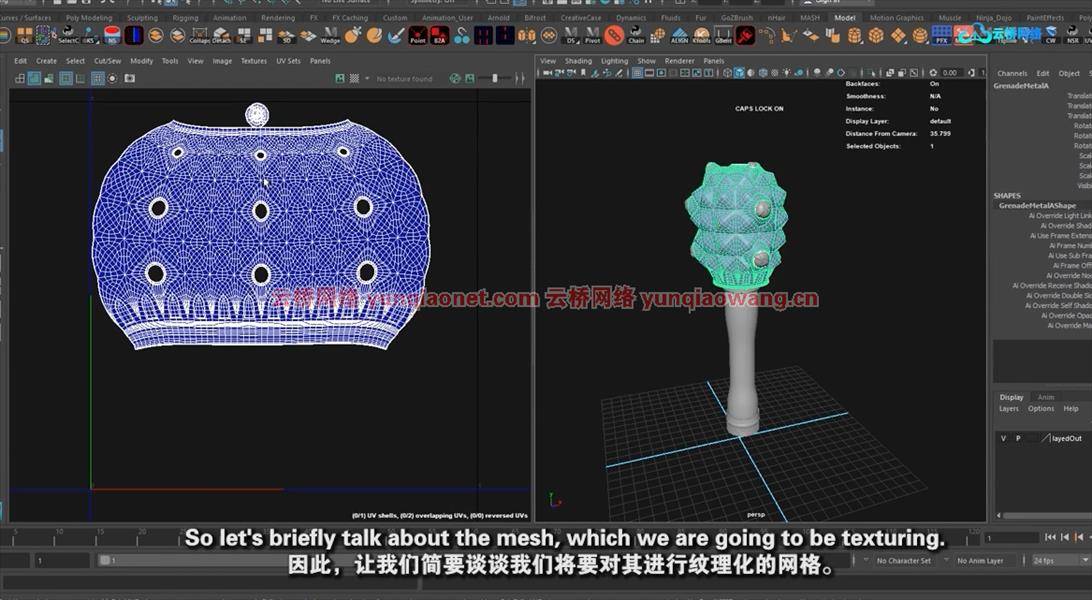
1.网格准备
2.Mari项目
3.材料遮罩
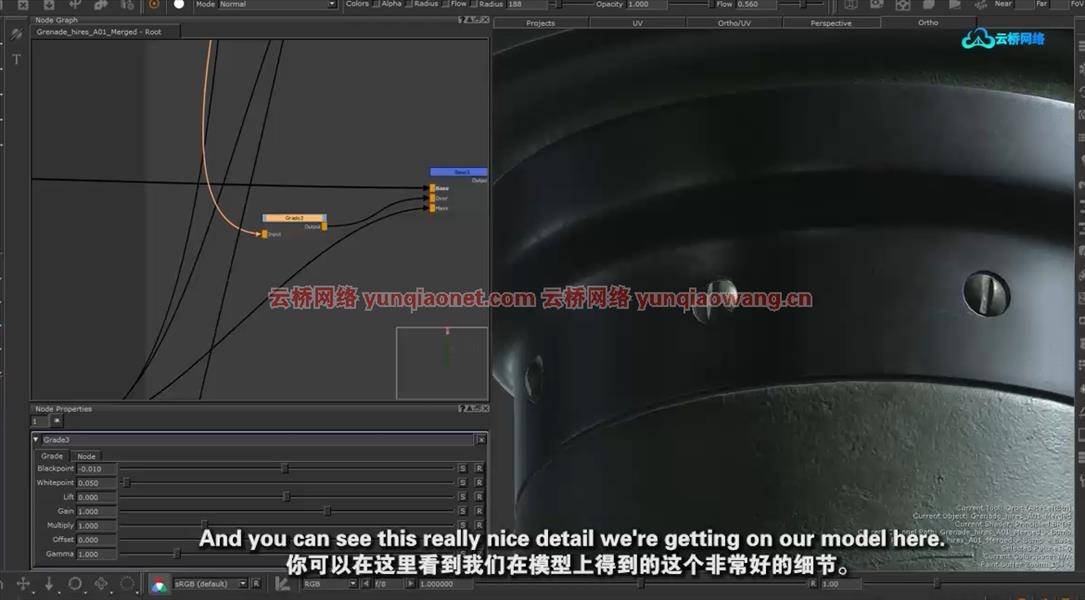
4.烘焙工具贴图
5.绿色金属底座
6.黑色金属底座
7.螺栓底座
8.清漆底子
9.排水量
10.绿色金属磨损
11.绿色金属边缘磨损
12.黑色金属边缘磨损
13.破旧的木头
14.防锈面具
15.黑色金属噪声
16.污垢第1部分
17.最后润色
18.RGB蒙版
19.最佳化
20.导出地图
21.看开发场景
22.材料阻塞
23.着色器混合第1部分
24.着色器混合第2部分
25.位移遮挡部分1
26.位移遮挡部分2
27.材料精制
28.凹凸细化
29.绘画贴花
Learn how to texture and look dev assets using the Mari 4 Node Graph and Maya.
What you’ll learn
You will learn how to prepare a model for texturing
You will learn fundamentals of texturing
You will learn how to use the Mari 4 node Graph
You will learn how to bake the neccessary maps for texturing
You will learn how to take your textures and set up a layered shader network in Maya using RGB masks to mix each material.
Requirements
Basic understanding of Mari 4 and Maya
Description
In this tutorial I will go over PBR texturing in Mari 4 using ONLY the nodegraph. Using the node graph opens up a huge amount of flexibility and allows you to work non destructively.The idea behind this workflow is to recreate the workflow of substance inside of Mari. I use the newest extension pack in this tutorial however if you do not have access to the extension pack you can still follow along just fine with the standard Mari nodes. (Note: Most VFX studios use the extension pack so I would highly reccomend using it while following along with this tutorial.)Once the texturing is complete we will take our textures into Maya and go over the look development process where we create a production ready master shader by using custom RGB masks to blend all our painted channels together. For this section we will be using Arnold 5 but any rendering engine that can blend materials will work just fine.RGB masks are a very important part of texturing as they allow you to refine and dial in your shaders within a game engine or rendering egine. Not only that but they are often used in during the compositing phase in VFX.
1、登录后,打赏30元成为VIP会员,全站资源免费获取!
2、资源默认为百度网盘链接,请用浏览器打开输入提取码不要有多余空格,如无法获取 请联系微信 yunqiaonet 补发。
3、分卷压缩包资源 需全部下载后解压第一个压缩包即可,下载过程不要强制中断 建议用winrar解压或360解压缩软件解压!
4、云桥CG资源站所发布资源仅供用户自学自用,用户需以学习为目的,按需下载,严禁批量采集搬运共享资源等行为,望知悉!!!
5、云桥CG资源站,感谢您的赞赏与支持!平台所收取打赏费用仅作为平台服务器租赁及人员维护资金 费用不为素材本身费用,望理解知悉!
6、For users outside China, if Baidu Netdisk is not convenient for downloading files, you can contact WeChat: yunqiaonet to receive a Google Drive download link.


